You’ve probably heard the term ‘API’ tossed around, but what exactly does it mean? If you’re not a developer, it can sound like another complicated tech term, leaving you scratching your head.
Don’t worry, you’re not alone!
In this guide, we’ll break down the concept of an API (Application Programming Interface) in simple, everyday language. Whether you're a business owner, marketer, or just someone curious about how apps and software communicate, we’re here to help you understand the basics.
Ultimately, you’ll have a clearer idea of why APIs matter and how they make the tech we use every day function smoothly.
What is an API?
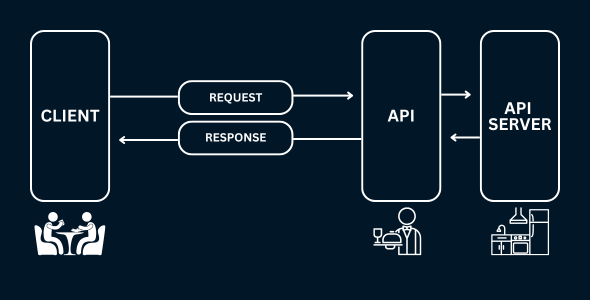
An API) is a set of rules and protocols that allows different software applications to communicate with each other. It acts as an intermediary that enables developers to access specific features or data from another application, service, or system without needing to understand its internal workings.
Think of an API as a waiter in a restaurant. When you place an order (a request), the waiter takes it to the kitchen (the system) and brings back your meal (the response). Similarly, an API allows one application to send a request to another and receive the necessary data or functionality in return.
APIs are commonly used in web and mobile applications, enabling integrations between different platforms. For example, when you use a weather app that fetches real-time forecasts, or log in to a website using your Google account, APIs facilitate these interactions.
By providing a structured way for software to connect and share information, APIs improve efficiency, reduce redundancy, and enable innovation. They are essential for modern technology, powering everything from social media integrations to payment gateways and cloud services.
Are APIs Developer Tools?
APIs are not developer tools in the traditional sense, but they are essential components that developers use to build and enhance software applications. Unlike developer tools, such as code editors, debugging software, or version control systems, APIs serve as intermediaries that allow different applications, systems, or services to communicate with each other. They provide predefined methods and protocols for data exchange, enabling seamless integration between various platforms.
While APIs streamline development by offering ready-made functionalities, they are more accurately classified as building blocks rather than standalone tools. Developers rely on APIs to improve efficiency, reduce redundancy, and create more powerful applications by leveraging existing services instead of coding everything from scratch.
Types of APIs
There are various types of APIs, each designed for specific use cases and access levels. Below, we explore five major types of APIs.
Web Application Programming Interface (Web API)
A web API is an API that enables communication between systems over the Internet using standard protocols such as HTTP or HTTPS. It allows web applications to access external services, databases, or functionalities, making it a crucial component in web development. Web APIs typically follow REST (Representational State Transfer) or SOAP (Simple Object Access Protocol) principles, ensuring structured and efficient data exchange.
These APIs are platform-independent and can be accessed through browsers, mobile applications, and servers. They enable developers to build dynamic, interconnected applications that rely on external data sources or services.
Open Application Programming Interface (Open API)
An Open API, also known as a Public API, is available for developers and businesses to use with minimal restrictions. These APIs are designed to promote innovation by allowing third-party developers to integrate external services and build new applications.
Open APIs are typically well-documented and require minimal authentication, often using API keys to track usage. They provide businesses with opportunities to expand their reach by enabling integrations with various external platforms.
However, due to their accessibility, Open APIs require strict security measures to prevent misuse and unauthorized data access.
Partner Application Programming Interface (Partner API)
A partner API is shared with specific business partners rather than being publicly available. These APIs enable secure collaboration between companies by allowing controlled access to specific functionalities or data. Unlike Open APIs, partner APIs require authentication and are governed by agreements between the involved businesses.
They play a critical role in business-to-business (B2B) integrations, allowing organizations to streamline operations, share resources, and enhance their services through seamless data exchange. Managing partner APIs requires careful oversight to ensure compliance with security policies and business agreements.
Internal Application Programming Interface (Internal API)
An internal API, also known as a private API, is designed for use within an organization. These APIs are not exposed to external users or third-party developers, serving as a means to connect internal systems and services.
They enhance operational efficiency by enabling different departments or teams to share data securely and automate processes. Internal APIs are often used in enterprise software development to improve system integration and streamline workflows. Because they are restricted to internal use, they typically have stronger security measures in place, ensuring sensitive company data remains protected.
Composite Application Programming Interface (Composite API)
A composite API allows multiple API requests to be combined into a single call. Instead of making multiple separate requests to retrieve or process data, composite APIs enable applications to perform several operations at once, improving efficiency and reducing network load. These APIs are particularly useful for complex systems that require data from multiple sources, as they minimize latency and optimize performance.
Composite APIs streamline development by reducing the number of requests a client has to make, making them an essential tool for improving user experience and application speed.
Application Programming Interface Security
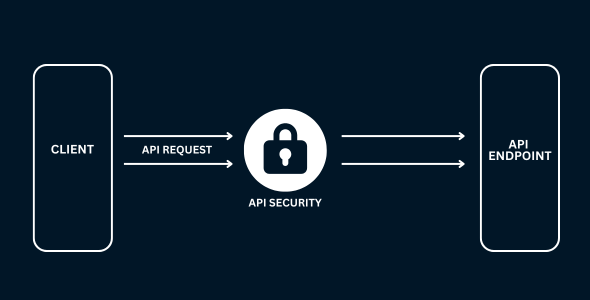
API security refers to the measures and best practices implemented to protect APIs from unauthorized access, data breaches, and cyber threats. Since APIs act as intermediaries between different software applications, they often handle sensitive data and critical system functionalities, making them prime targets for attackers.
APIs are widely used in modern applications, from mobile apps to cloud services, facilitating seamless integration and data exchange. However, without proper security, APIs can expose vulnerabilities that hackers can exploit. A compromised API can lead to data leaks, unauthorized access, service disruptions, and even financial losses. Ensuring API security helps protect user data, maintain system integrity, and comply with regulatory standards such as GDPR and HIPAA.
API security is used to authenticate users, control access, and prevent malicious activities. It ensures that only authorized applications and users can interact with an API. Security measures include authentication (e.g., API keys, OAuth, JWT), encryption (SSL/TLS), rate limiting to prevent abuse, and monitoring for detecting unusual activities. Secure APIs help businesses build trust with users, safeguard sensitive data, and ensure the stability of their digital services.
The Use of an Application Programming Interface Key
An API key is a unique identifier used to authenticate requests made to an API. It acts as a digital credential, allowing applications to communicate securely with an API while controlling access to its functionalities and data.
API keys are primarily used for authentication and authorization, ensuring that only approved users or applications can access the API. When an application sends a request, it includes the API key, which the API validates before processing the request. This helps prevent unauthorized access and misuse.
API keys are also used for tracking and monitoring API usage, allowing API providers to set rate limits, manage billing, and analyze usage patterns. Although API keys provide a basic level of security, they should be combined with additional security measures like OAuth and HTTPS encryption to enhance protection against unauthorized access and potential cyber threats.
The Importance of API Testing
API testing is crucial because without proper testing, APIs may fail to deliver expected results, leading to security vulnerabilities, data inconsistencies, and poor user experiences.
API testing ensures the following:
- Functionality: APIs return the correct data and perform as expected.
- Security: sensitive data remains protected, preventing unauthorized access.
- Performance: APIs handle large volumes of requests efficiently without downtime.
- Reliability: APIs consistently deliver accurate results across different environments.
- Compatibility: APIs integrate smoothly with other applications and services.
By identifying bugs early, API testing helps reduce development costs and ensures high-quality applications.
How API Testing is Done
API testing is typically performed using automated tools and scripts rather than a traditional user interface. The key steps include the following.
- Setting up the testing environment—define the API endpoints, request parameters, and expected responses.
- Executing test cases—various types of tests are conducted, including:
- Functional testing: ensures the API meets business requirements.
- Load testing: evaluates how the API performs under heavy usage.
- Security testing: identifies vulnerabilities like data breaches.
- Error handling testing: checks how the API responds to invalid requests.
- Validating responses—compare actual responses with expected outputs to confirm correctness.
- Logging and reporting—document errors and performance metrics for further analysis.
Well-executed API testing helps ensure stable, secure, and efficient applications.
API Examples in App Development
We have compiled some examples in order to understand how APIs are used in real-life applications.
Web Application Programming Interface (Web API)
A web API enables communication between an application and web-based services using HTTP protocols. In app development, a weather application might use a Web API to retrieve real-time weather data from a third-party weather service. The app sends an HTTP request to the web API, which returns temperature, humidity, and forecast data in a structured format like JSON or XML. This allows the weather app to display up-to-date conditions without storing large amounts of data locally.
Open Application Programming Interface (Open API)
An Open API, also known as a public API, is available for any developer to use without restrictions. A common example is the Google Maps API, which allows developers to integrate interactive maps, location data, and navigation features into their apps. For instance, a food delivery app can use the Google Maps API to show customers where their orders are in real time, helping improve the user experience with accurate location tracking.
Partner Application Programming Interface (Partner API)
A partner API is shared with select business partners rather than being publicly available. For example, an e-commerce platform might integrate with a third-party payment gateway API, such as PayPal’s Partner API, to enable seamless transactions. The API is only accessible to authorized businesses that meet specific partnership agreements, ensuring secure and controlled integration. This helps e-commerce platforms offer multiple payment methods without developing their own payment processing system.
Internal Application Programming Interface (Internal API)
An internal API is used within an organization to facilitate communication between internal services and applications. A large enterprise with multiple internal systems, such as an HR management platform, can use an Internal API to connect different services. For example, an employee management app within a company might use an Internal API to fetch payroll data from the finance system or retrieve employee details from the HR database. Since these APIs are not exposed to external users, they provide enhanced security and efficiency in internal operations.
Composite Application Programming Interface (Composite API)
A composite API allows an application to make multiple API calls in a single request, improving efficiency. A ride-hailing app, such as Uber, might use a composite API to fetch driver availability, estimated fare, and user location all at once. Instead of making three separate requests, the app sends one API call to retrieve all necessary data, reducing latency and improving app performance. This enhances the speed and responsiveness of the app, leading to better user experience.
At AppIt, we specialize in creating custom mobile and web applications that are built to meet the specific needs of our clients. Our expertise extends across various industries, from e-commerce to healthcare, ensuring high-quality, scalable, and innovative solutions. We understand the vital role APIs play in modern app development. Whether it’s connecting to external data sources, integrating third-party services, or ensuring seamless communication between different platforms, APIs are at the core of the functionality we deliver. We prioritize efficient and secure API integration to enhance your app’s performance.
Ready to bring your app idea to life with expert API integration? Contact AppIt today to start your project.